How to Register for Your Pearson Edexcel Exams (Private Candidate Guide)
If you’re planning to take your Pearson Edexcel exams privately, the process can feel a bit overwhelming at first. But don't worry! I’ve put together this step-by-step guide to help you navigate the British Council registration portal smoothly. Just follow along, and you’ll have your registration done in no time.
Step 1: Visit the British Council Portal
The very first thing you need to do is get to the right website. The British Council uses a specific system called the School Registration System (SRS) for all private candidates.
The Link: https://schoolexams.britishcouncil.org
Step 2: Create Your Account
Once you click the link, the first thing you’ll need to do is set up your account. Think of this as creating your "Candidate Profile" this is where all your exam details, timetables, and results will eventually live.
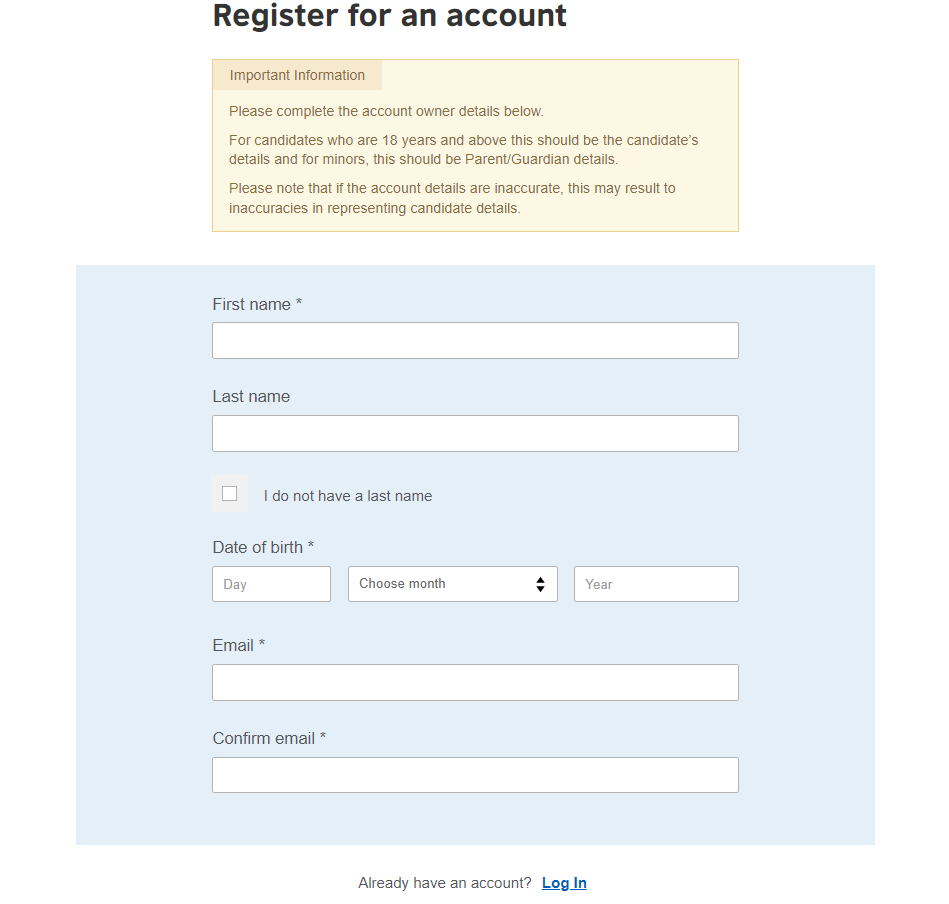
What you need to fill out:
First and Last Name: Make sure you enter your name exactly as it appears on your CNIC, Passport, or B-Form.
Date of Birth: Use the dropdowns to select your day, month, and year of birth.
Email Address: Use an email that you actually check regularly. The British Council will send your confirmation, venue details, and timetable here.
If you’ve registered for exams before you don’t need a new account. Just click the "Log In" link at the bottom of the page to skip this step.
Step 3: Activate Your Account and Log In
Once you’ve hit that register button, your account isn't quite "live" yet. The British Council needs to make sure your email address is real, so they’ll send you an activation link.
What you need to do:
Check your Inbox: Head over to your email. You should see a message from the British Council (if it’s not there, check your Junk or Spam folder it sometimes ends up there!).
Click the Activation Link: Inside that email, there will be a link to verify your account. Clicking this will officially activate your profile and redirect you back to the British Council website.
Log In: Now that you’re verified, enter the email address and password you just created.
Imp: If you don't receive the email within 10 minutes, try requesting a "Resend" on the website. Also, make sure you keep your password written down somewhere safe; you'll need it later to download your Statement of Entry and check your results!
Step 4: Selecting Your Location
After logging in, you’ll be greeted by the official British Council registration landing page. This is where the system tailors the experience to your specific region.
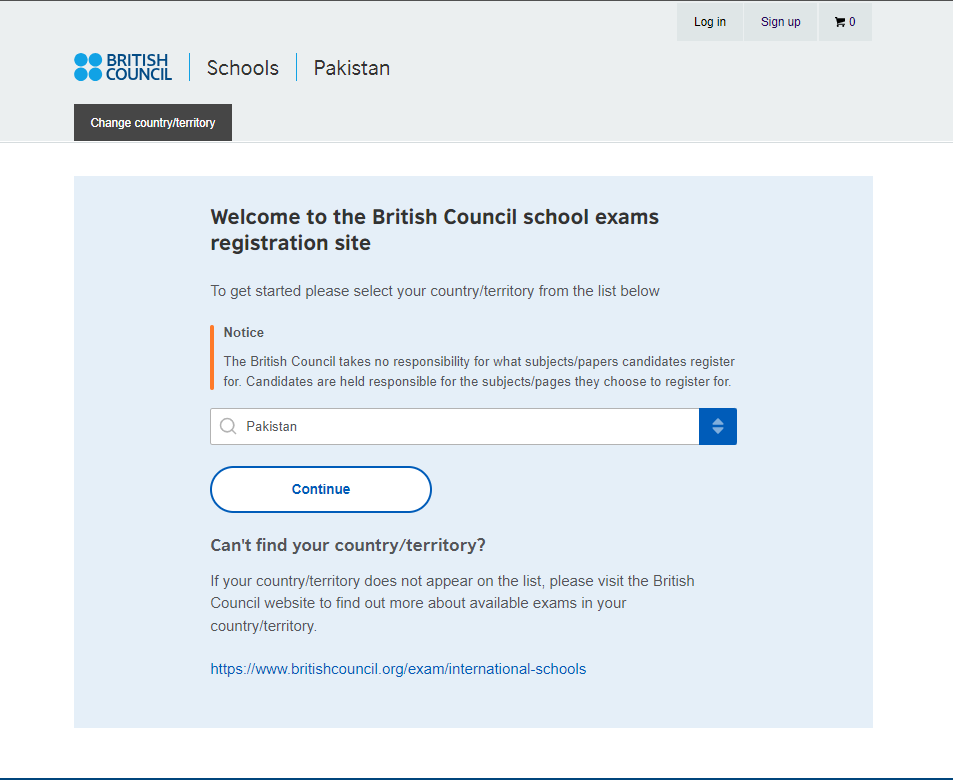
What to do on this screen:
Confirm Your Country: In the search box, you’ll see a list of countries. If you're registering from Pakistan (as seen in the example), make sure "Pakistan" is selected.
The "Notice" Box: You’ll see a small orange disclaimer. It’s basically reminding you that you are responsible for picking the right subjects and papers. The British Council won't double-check if you’ve picked the right syllabus code, so keep your school or private syllabus guide handy!
Click Continue: Once your country is set, hit that big blue Continue button.
Step 5: Choosing Your Awarding Body
Once you’re logged in and have your profile ready, you’ll land on the "Search for exams" page. This is the starting point for building your exam schedule.
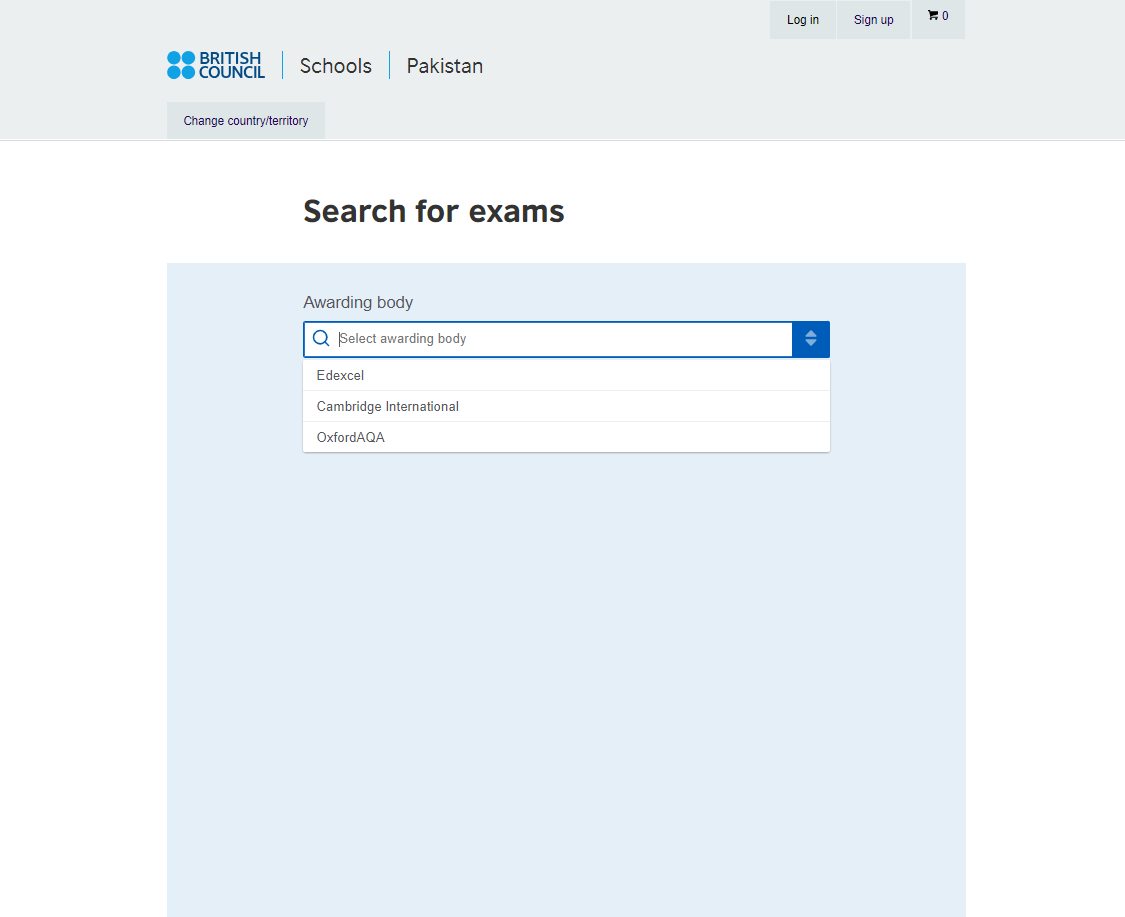
What to do on this screen:
On this page, you need to select the Awarding body. Since you are looking to register for Cambridge exams, you’ll see a few options in the dropdown menu:
Select "Edexcel": From the list (which also includes Cambridge International and OxfordAQA), make sure you click on Edexcel.
Step 6: Choosing Your Session & Qualification Level
Once you’ve selected "Pearson Edexcel" as your awarding body, two new dropdown menus will appear: Session and Qualification Level. This is a vital step because it tells the British Council exactly which "exam window" and what type of certificate you are aiming for.
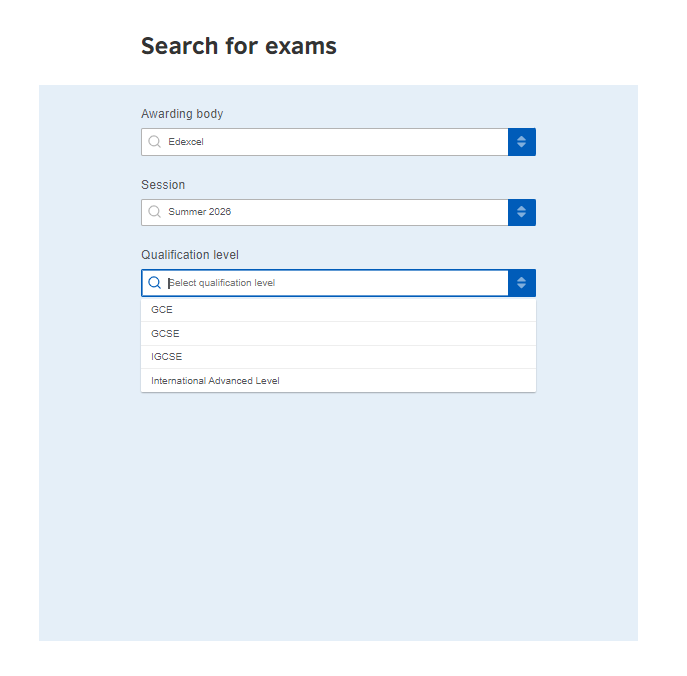
What to do on this screen:
- Select the Session: Click on the "Session" box. For most Pearson Edexcel students, you’ll be looking for "Summer 2026" (which is the May/June series).
- Select Qualification Level: This is where you define your exam tier. Depending on your goals, you will select:
- IGCSE: If you are a Year 10 or 11 student taking International GCSEs.
- International Advanced Level (IAL): If you are taking AS or A2 units. This is the modular version specifically for international students.
- GCE/GCSE: Only select these if your syllabus specifically requires the UK-based version (usually for students applying to very specific UK pathways).
If you select "Summer 2026" and your subject doesn't appear in the next step, double-check the Edexcel timetable. Some niche subjects are only available in specific sessions!
Step 7: Choosing Your Exam Location
Now that the system knows what you are taking, it needs to know where you’ll be taking it. A new dropdown called "Location" will appear.
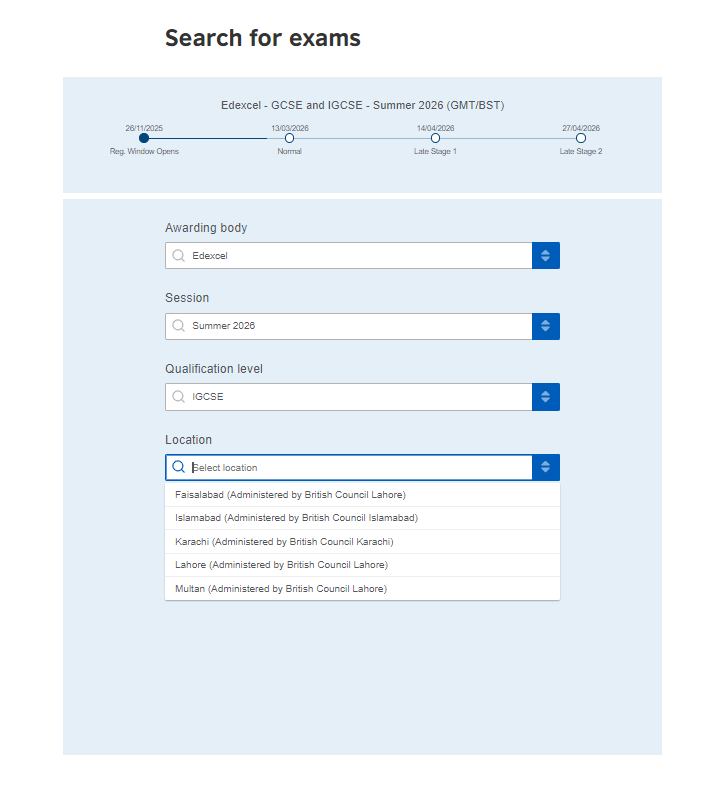
What to do on this screen:
Select Your City: Click the dropdown and find your city from the list. As you can see in the example, it lists cities like Islamabad, Karachi, Lahore, and Faisalabad.
Check the Administering Office: Next to your city, you’ll see which main British Council office is handling your area (e.g., "Administered by British Council Lahore"). This is just for your information so you know who to contact if you have local queries.
Step 8: Selecting Your Subjects
Once you’ve set your location (like Lahore or Karachi), the final dropdown menu for "Subjects" will appear. This is where you build your exam list.
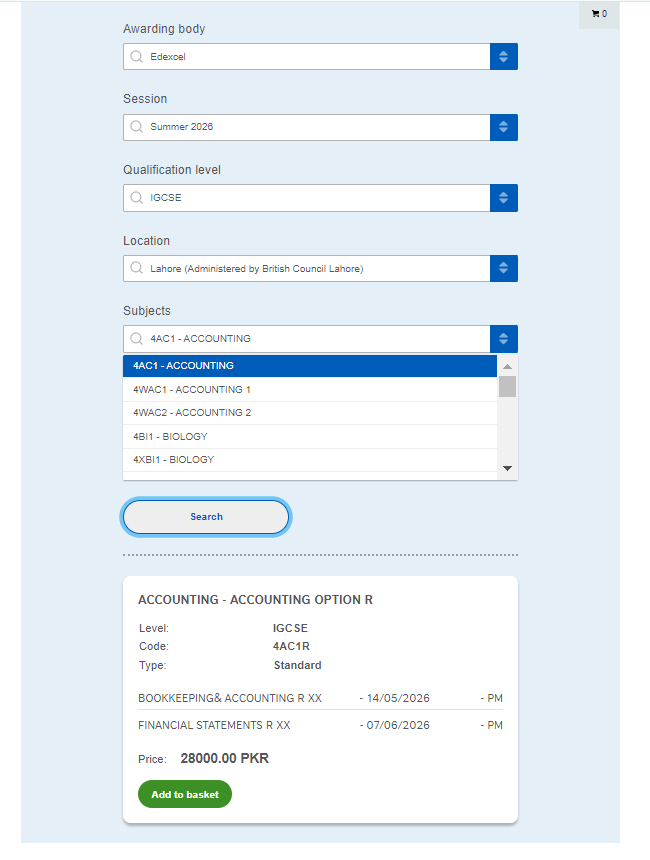
What to do on this screen:
Search for your Subjects: Click the "Select subjects" box. You will see a long list of options.
Match the Codes: Pay very close attention to the 4-digit code before the subject name.
Why? Some subjects have very similar names but different syllabus codes. Always double-check your textbooks or syllabus to make sure the code matches exactly.
Step 8: Reviewing Your Exam Basket
Once you click "Add to Basket," a summary card for each subject will appear. This is your chance to double-check everything before you spend any money.
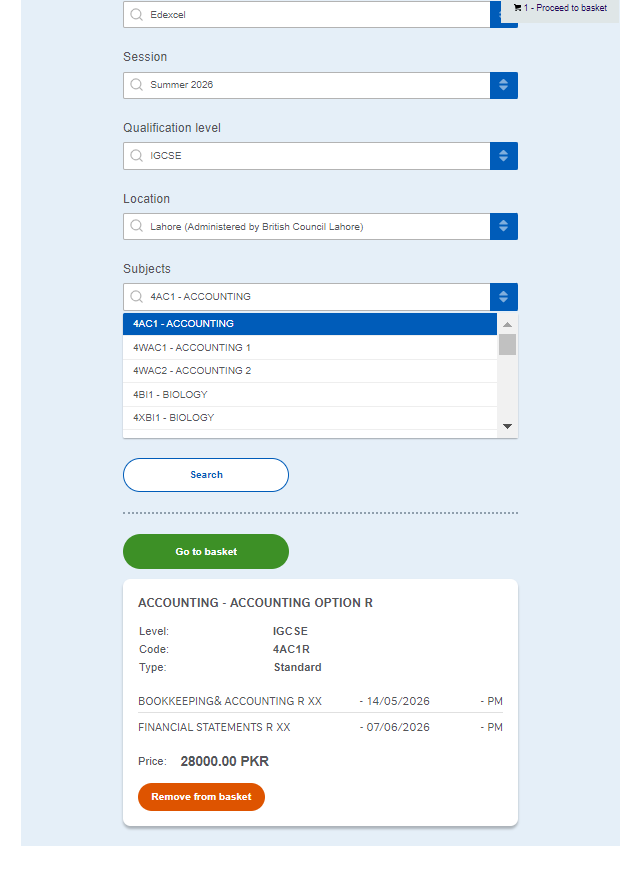
What to check in your basket:
- Option Codes: In the screenshot, you’ll see "Option R" (e.g., 4AC1R). The "R" usually refers to regional papers for specific time zones. Ensure this matches what your tutor or school recommended.
- Dates & Times: The system will show you the exact dates for each paper and whether they are in the AM or PM.
- Pricing: Check the final price in your local currency (e.g., 28000.00 PKR per subject). If you’ve added something by mistake, just hit that orange "Remove from basket" button.
In the screenshot, you see just one subject selected as an example. However, it is vital that you search for and add every single subject you are studying for this session right now.
Step 9: Final Basket Review
Once you’ve added all your subjects, you’ll be taken to the Exam basket page. Think of this as your final checkout screen. This is the most important page to review because it summarizes everything you are about to pay for.
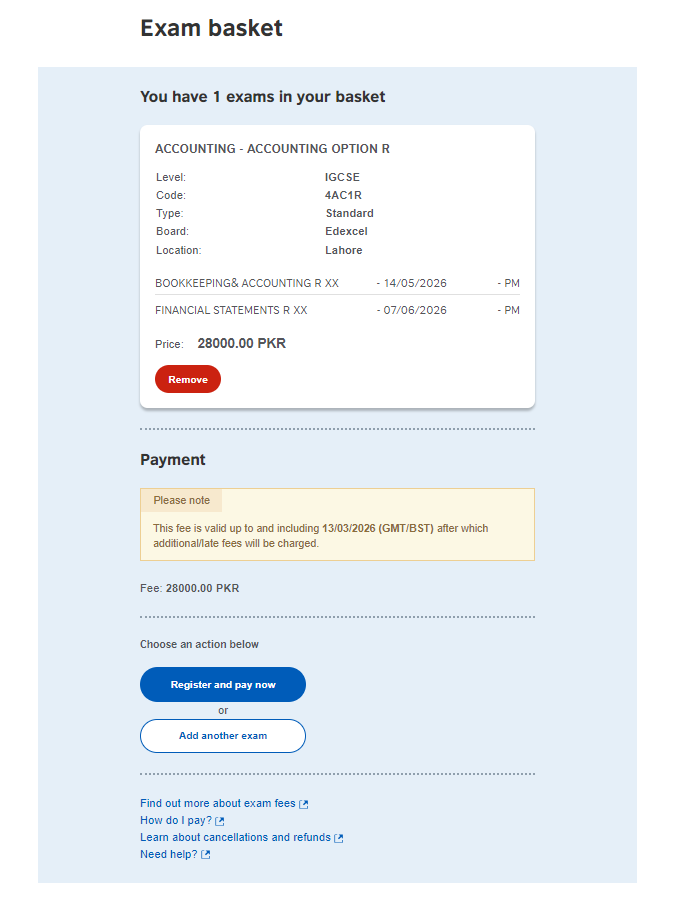
What to double-check on this screen:
- The Details: Ensure the Level , Subject Code, and Location are exactly what you intended.
- The Exam Dates: Take a quick look at the dates and times (AM/PM).
- The Price: Verify the total fee.
- The "Late Fee" Warning: Pay close attention to the yellow "Please note" box. It tells you exactly when the current price expires. For example, if it says 13/03/2026, you must finish your payment before that date, or the price will jump up significantly due to late entry fees.
What to do next:
- If you forgot a subject, click "Add another exam."
- If everything looks perfect, click "Register and pay now." This will take you to the final stage where you'll enter your ID details (like your Passport) and choose how you want to pay.
Step 10: Entering Candidate Details
Once you click "Register and pay now," you’ll be taken to the Candidate details form. This is where you provide your personal information for your official exam documents.
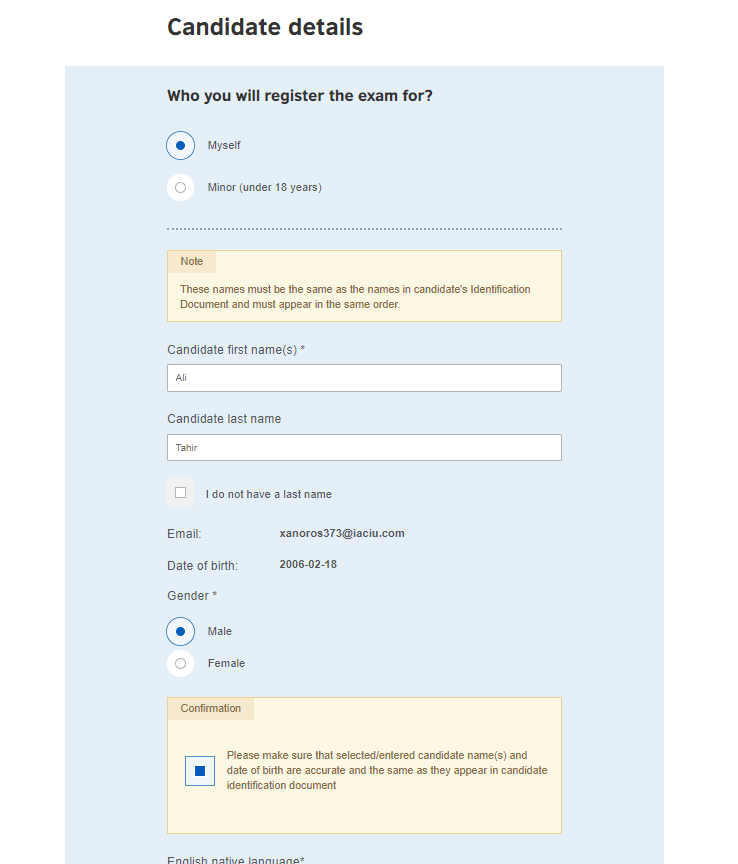
What to do on this screen:
- Who are you registering? Since you are doing this for yourself, select the "Myself" bubble.
- Legal Name Check: Enter your First Name and Last Name exactly as they appear on your ID (Passport or CNIC/B-Form).
- Crucial: Do not use nicknames! If your ID says "Muhammad Ali," don't just write "Ali."
- Confirm Information: Check the box that says you've verified your name and date of birth are accurate. This is your way of telling the British Council, "Yes, I've double-checked my ID!"
- Gender: Select your gender as it appears on your official documents.
Contact & Address Information
Scroll down to complete your profile. This information is used for mailing your certificate and contacting you if there’s an emergency with your exam venue.
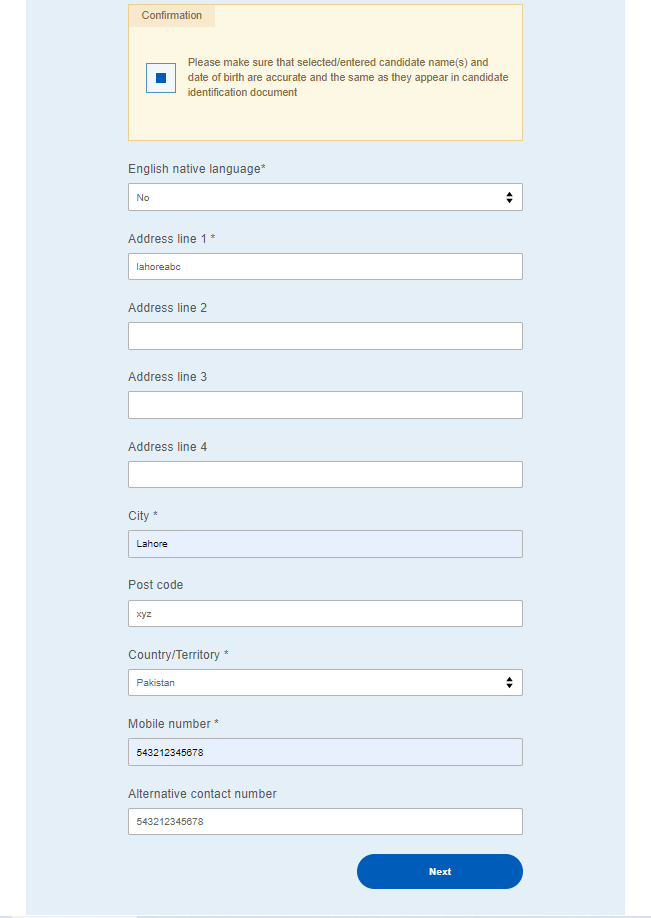
What to fill out here:
- English native language: Select "No" (unless English is actually your first language).
- Address: Provide your current home address.
- City & Post Code: Enter your city (e.g., Lahore) and your local postal code.
- Mobile Number: Enter a working mobile number. The British Council often sends SMS alerts for venue changes or result releases here.
- Alternative Number: It’s a great idea to put a parent’s or sibling's number here, just in case your phone is off.
Final Action: Once every box with a red asterisk (*) is filled, hit the blue Next button.
Step 11: Registering as a Minor (Under 18)
If you are a parent registering for your child, or a student under 18 using a parent's account, this is the section for you. The British Council has extra safety steps for minors, so the forms will ask for a bit more detail than the standard "Myself" registration
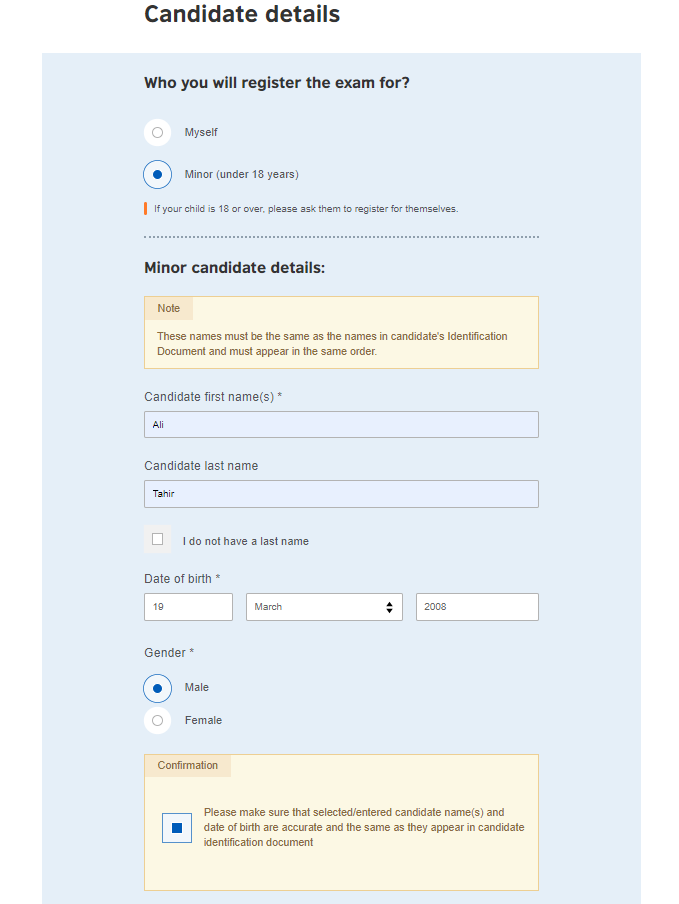
.What to do on this screen:
- Select "Minor (under 18 years)": Once you click this, the "Minor candidate details" section will open up.
- The Student’s Legal Name: Just like the adult version, enter the student’s First and Last Name exactly as they appear on their B-Form or Passport.
- Date of Birth: Enter the student's birthday. If the system calculates they are 18 or older, it will actually prompt them to go back and register "Myself."
- Confirm Details: Tick the blue confirmation box. This is your promise that the name and birthday match the official ID.
The next part of the minor registration is the contact info. Even if you live in the same house, this should be the primary address where you want the student's results mailed.
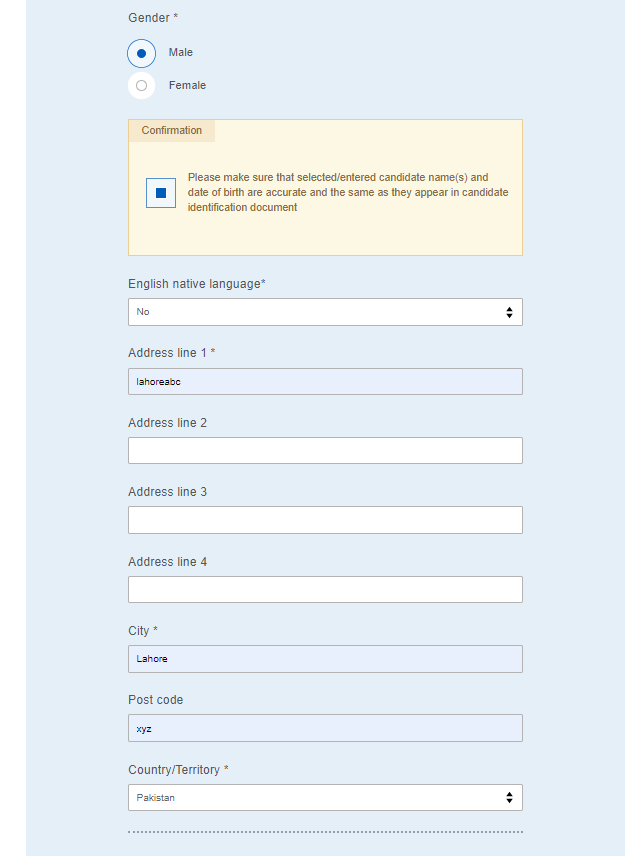
- Address & City: Fill in your street address and city (e.g., Lahore).
- Postal Code: Don't forget the post code!
Child Protection & Contact Details
Because the student is under 18, the British Council needs to know who is responsible for them and how they will get home after the exam.
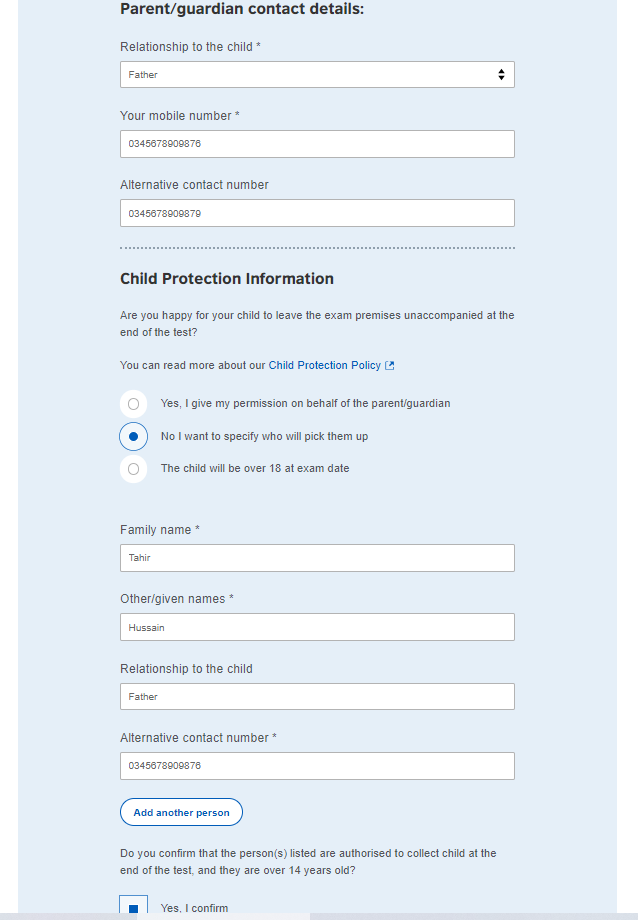
What to fill out here:
- Relationship to the child: Select whether you are the Father, Mother, or Legal Guardian.
- Mobile Numbers: Provide two different working numbers so the British Council can reach a parent instantly if needed.
- Child Protection Information: This is a big one! You have to decide if the student is allowed to leave the exam hall alone.
- Option 1: "Yes, I give my permission" (The student can walk out and go home on their own).
- Option 2: "No, I want to specify who will pick them up" (You’ll need to provide the name and ID of the person coming to get them).
- Authorization: Confirm that the person picking up the student is over 14 years old.
Step 12: Identity Verification
Now that you’ve confirmed your subjects, it’s time to link your registration to your official identity. This is a critical step because the details you enter here must match the ID you bring to the exam hall.
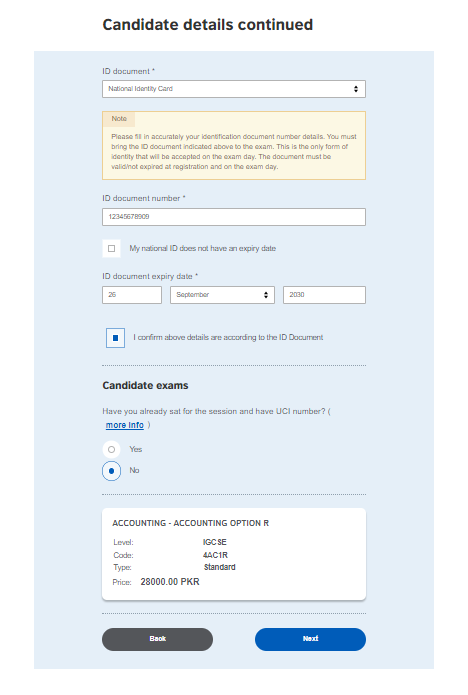
What to do on this screen:
- ID Document: Choose your identification type from the dropdown (e.g., National Identity Card or Passport).
- ID Document Number: Carefully type in your ID number. Double-check every digit if this is wrong, you might face issues on exam day!
- Expiry Date: Enter the date your ID expires. If your National ID doesn't have an expiry date, there is a handy checkbox you can tick.
- The UCI Question: You will see a section asking if you have a UCI number.
- Select "No" if this is your first time taking an Edexcel exam. The system will create a new one for you.
- Select "Yes" only if you have taken Edexcel exams before and have your 13-digit UCI number from a previous Statement of Results.
- Final Confirmation: Tick the box that says "I confirm above details are according to the ID Document."
- Make sure your ID is valid and won't expire before your exams start in May or June. The British Council is quite strict about this!
Step 12:Terms and Conditions
You’re almost at the finish line! Before the system lets you pay, it’s going to show you a long page of Terms and Conditions. While it’s tempting to just scroll through, there are a few things you really need to know.
What you’re agreeing to on this screen:
- Accuracy is on you: The British Council won't check if you picked the wrong unit codes. If you make a mistake, you'll have to pay an "amendment fee" later to fix it.
- The ID Rule: You must bring the exact same ID (Passport or CNIC) that you registered with to the exam hall. No ID = no exam.
- The Statement of Entry (SOE): You’ll receive your official timetable and venue details via email about two weeks before your first exam.
- Payment Methods: If you aren't paying by card online, it explains the Standard Chartered Bank (SCB) Drop Box facility. You’ll need to use a specific deposit slip and mention your registration number (A2PK number) on it.
How to finish:
- Scroll to the very bottom.
- Tick the box that says "I have read the terms and conditions."
- Click the big green "Complete registration" button.
Once you click that, you'll be officially registered in the system! You'll just need to make sure your payment is processed before the deadline shown in your basket to avoid those late fees.
Step 13: Choosing Your Payment Method
After you agree to the terms, you’ll reach the payment gateway. You need to decide whether you want to pay instantly online or manually through a bank.
Option A: Pay Online
If you have a Visa or Mastercard (Debit or Credit card), this is the quickest way to get things sorted.
- The Perk: Your registration is confirmed almost instantly.
- Keep in Mind: The British Council settled these in foreign currency, so your bank might add a small fee due to fluctuating exchange rates on top of the 28000.00 PKR shown.
Option B: Pay Offline (Bank Deposit or Transfer)
If you don't want to use a card, select "Pay another way."
- Cash: You can visit any Standard Chartered Bank (SCB) or Muslim Commercial Bank (MCB) branch and deposit the cash using the British Council's specific deposit slip.
- Bank Transfer/ATM: You can use your banking app (IBFT) or an ATM to transfer the funds.
How to Pay via Bank Transfer/ATM (IBFT)
If you chose the "Offline" route, pay close attention to the instructions on your screen. This is where most students get confused, but it’s actually quite simple if you follow these steps:
What to do:
- Find your Virtual Account Number: The system will give you a unique 16-digit Virtual Account Number.
- CRITICAL: This number is tagged only to your registration. Never use a friend’s number, or your payment won't be tracked to your account!
- The Transfer: * Select Standard Chartered Bank as the beneficiary bank.
- Enter your specific 16-digit Virtual Account Number.
- The beneficiary name should automatically appear as "British Council".
- Confirm the Amount: Enter the exact fee shown in your basket (e.g., 28000.00 PKR) and hit send
Important Note: If you pay offline, your status on the portal won't change to "Paid" immediately. It usually takes 2 to 3 working days for the bank to sync with the British Council. Don't panic if it still says "Pending" right after you pay!
Once you’ve noted down your details or completed the transfer, click the blue Continue button to wrap up your session.
Step 14: Registration Confirmation
You’ve done it! Once you’ve selected your payment method and hit continue, you’ll land on the "Offline payment method selected" (or Online confirmation) page. This is proof that your registration is sitting in the system.
What to look for on this screen:
- Registration Status: You’ll see a message saying "Registration complete" with a green bar. This means the British Council has your details.
- Transaction Reference Number: Note down the number starting with A2PK.... This is your unique reference for this specific registration.
- The Deadline Reminder: Even though you're "registered," your seat isn't fully secured until the money reaches them.
- Exam Summary: Double-check the list one last time.
Now that the online part is done, here is the final "offline" checklist:
- Wait for the Email: You should receive an automated email from the British Council within a few minutes confirming they've received your registration.
- Wait for the "Paid" status: If you paid offline, give it about 3 working days for your status to update on the portal.
- Statement of Entry: Keep an eye on your inbox about two weeks before the exams start for your final venue and timing details.
Step 15: Your Official Registration Email
Once you’ve hit that final button on the portal, check your inbox! You will receive an automated email from the British Council. This is your most important document until your Statement of Entry arrives.
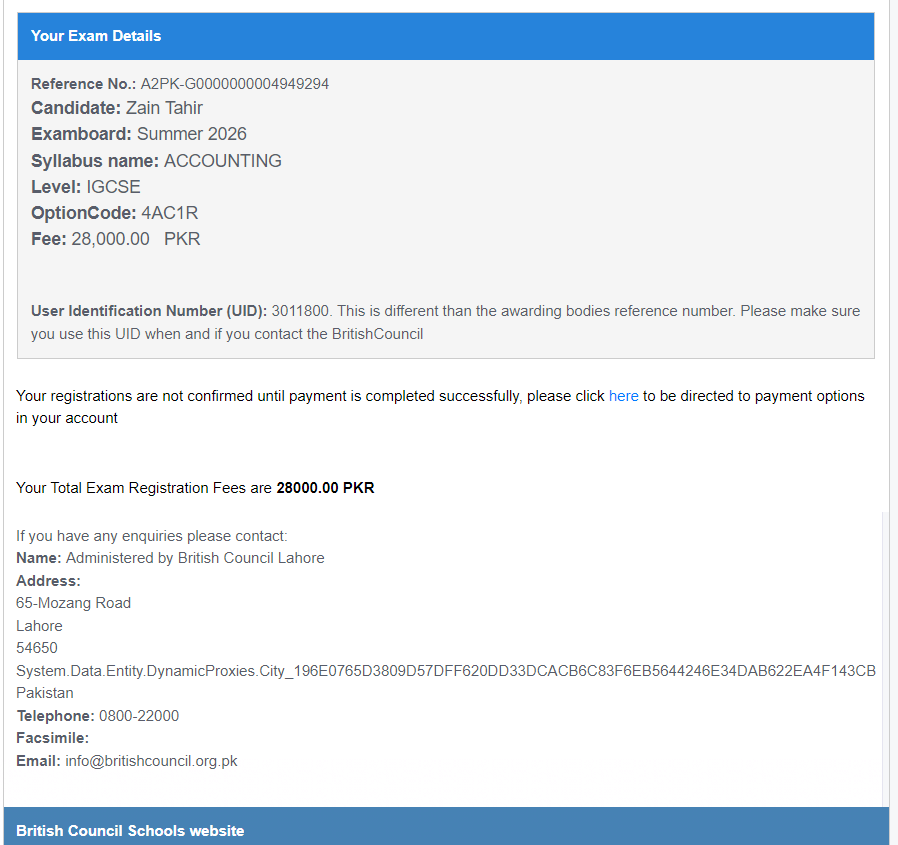
What this email tells you:
- The Reference Number: Right at the top, you’ll see your A2PK Reference No. (e.g., A2PK-G00000000004949294). Quote this whenever you contact the British Council.
- The UID: You are assigned a User Identification Number (UID). Keep this handy it’s different from your exam board reference but just as important for tracking.
- Your Exam Line-up: It lists exactly what you’ve registered for, including the Syllabus name , the Level , and the Option Code.
- Payment Status Warning: The email clearly states that your registration is NOT confirmed until payment is completed successfully.
What to do while you wait:
- Monitor your Inbox: Keep an eye on your email for the "Payment Confirmed" notification (if you paid offline) and your official Statement of Entry, which usually arrives a few weeks before exams start.
- Double-Check the Dates: Mark your exam dates on your calendar now so there are no surprises.
- Keep your ID Safe: Remember, the Passport or CNIC/B-Form you used for this registration is your "ticket" into the exam hall. Keep it in a safe place!
Need Help?
If you run into any technical glitches or have questions about your specific subjects, you can always reach out to the British Council Pakistan directly:
- Email: info@britishcouncil.org.pk
- Helpline: 0800-22000
Good luck with your studies! You’ve done the hard work of signing up now it’s time to focus on aceing those exams.